Paperboat Portfolio
The core idea is to make it easy to add your creative works to your website.
You just upload the images of your creative projects to a folder and create a .html file with the text and links you want with the images/projects. Then Paperboat will add this to the menu of your website and show the images of your project as a gallery view.
You can also create simpler pages for your CV or contact information to your website.
This page is running on Paperboat and you can also see it in action on: https://darch.dk/paperboat
The source code is available at: https://codeberg.org/sorenpeter/paperboat
Paperboat is still very much a work-in-progress, so always make a backup before trying a new version of Paperboat.
🛠 Installation and setup
- You need a web-hosting with PHP and a domain
- Download the zip from codeberg
- Upload the content of the zip to the root folder or sub-folder via FTP
- Make sure to get the hidden
.htaccessnext toindex.phpuploaded as well
- Make sure to get the hidden
- Open
settings.iniand add your info and set your preferred layout - Add your projects and pages
- Customize the look and feel
🗃 Adding pages and projects
Paperboat have support for projects and pages.
- Projects are folders within the projects folder. It must contain a
.htmlfile and image files, that will be rendered as gallery view. - Pages are html-files within the pages folder.
🎨 Customize the look and feel
Paperboat comes with some very basic layout and color schemes. You can customize them by adding a custom.css in the assets-folder.
To help you get started there is a custom_template.css you can rename or copy to custom.css
Besides the default layout, two more are included, called sidebar and topbar. You can activate them from the settings.ini.
To add your logo simply upload a image-file called logo.png to the assets folder.
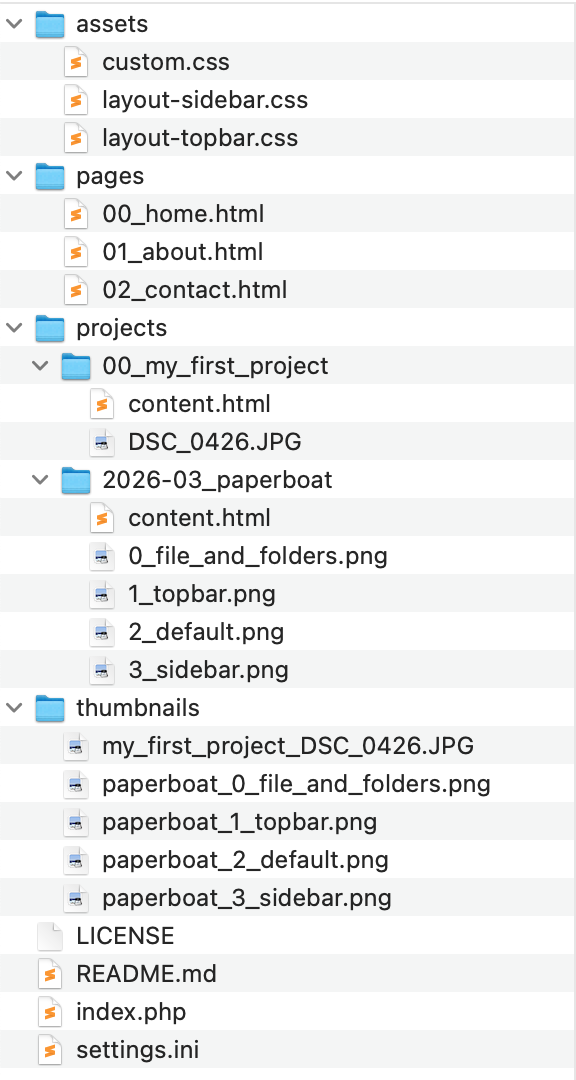
🗂 Files and folders
- 📂
assets/- all the general files goes here- 📄
layout-sidebar.css - 📄
custom.css - 🖼️
logo.png - 🖼️
favicon.png
- 📄
- 📂
pages/- where you pages live- 📄
00_home.html- the file calledhomeis the front-page of your portfolio - 📄
01_about.html- an about page. The name of this file, without the prefix numbers, determines the path to the page - 📄
02_contact.html- and a contact page.
- 📄
- 📂
projects/- 📂
00_myfirstproject/- this is a project. The name of this folder without the prefix numbers determines the path to the project- 📄
content.html- this is the content of the 'my first project'. This file can be named anything as long as it ends in.html - 🖼️
IMG_0001.jpg- some image files - 🖼️
IMG_0002.jpg- that will be shown - 🖼️
IMG_0003.jpg- as a gallery
- 📄
- 📂
2016-03-15_paperboat/- Another project, this one have a date as a prefix- 📄
content.html - 🖼️
boat.jpg - 🖼️
logo.jpg - 🖼️
paper.jpg
- 📄
- 📂
- 📁
thumbnails/- Contains all the auto generated thumnails for your projects (can be deleted) - ⚙️
.htaccess- hidden file, that is needed for loading paperboat (do NOT edit) - ⚙️
index.php- this is the main program (do NOT edit) - 📄
settings.ini- this is where you change your settings (please do edit)
📝 Inside the HTML
The first <h1> within a html-file in the pages or projects folders determines the title of the page or project. The title is what is shown in the navigation menu.
<h1>Name of my project</h1>

<p>This is a paragraph</p>

<a href="https://example.com">This is a Link to example.com</a>

<h2>This is a sub heading</h2>

<p>And anoter paragraph</p>
If you don't already know HTML and CSS, then here are a few good places to get you started:
🖼 Thubnails and gallery view
When you load a project page for then first time Paperboat will generate thumbnails for all the images in the gallery and save them to the thumbnails folder.
You can change the resolution of the thumbnails by change the number after thumbnail_size = in the settings.ini file.
After doing so then delete the thumbnails folder to get fresh thumbnails. Also if there is any issues with thumbnails then you can also delete the thumbnails folder.
If you don't want a grid view for you gallery, you can add the following to your custom.css in the assets folder.
/* Gallery: Turn off grid, and show each image full width */

.gallery {
    display: block;
}
You will the also want to set the resolution of the thumbnails in settings.ini to something like thumbnail_size = 800 to avoid pixelated images.
✍️ Image captions
If you need to add captions to individual images, you can do so by adding it to the filename after two dashes (--) and before the file type (eg. .jpg)
This will look something like this: IMG_24325445--Photo by Martin Johanson (2022).png,
and then the caption Photo by Martin Johanson (2022) will be shown underneath the image.
Please note there are some special symbol you cannot use in the filenames, so try keep it to plain text, numbers, parenthesis, periods, commas and at-signs.
🏷 Tags for organize your projects
If you have a lot of projects that you want to show in your portfolio, the navigation menu might get too crowed.
That is why Paperboat support tags. You add a tag by adding +tagname to the folder name of your project, so it will look like this: 00_my_first_project+art and 2025_expo_in_cph+art
Now you can get an overview of all your art projects by going to yoursite.net/art
You can also see all tags by visiting yoursite.net/tags
It is possible to add more then one tag to a project, so it will show up in multiple collections:
00_my_first_project+art2025_expo_in_cph+art2026-01_genurary+art+code2026-03_paperboat+code
To make a tags page with a custom title and some extra text, you just need to create a page with the same filename as the tag.
So if you make a tags-page called /pages/art.html it will show all your projects with the tag +art under whatever you put in that file.
📸 Covers for projects
You can add a cover image to your project, that is shown on the on the home page or on a tags page.
Just add a cover.png, cover.jpg, or cover.gif to each project folder.
Note that the cover image will also be shown as part of the gallery view, so you can also just rename
one of the images to start with the word cover eg. cover_IMG33123.jpg.
If there is no cover image file for a project, then a default cover from /assets/cover.png will be use.
You can change the default cover by replacing the cover.png in the assets folder.
📣 Inspiration / Shutouts
- Feber Feber is a simple, self-hostable group calendar. And it only one index.php (+assets)
- Indexhibit An archetypal portfolio cms for everybody
- Lichen-Markdown is a simple and friendly CMS for making static websites
- Stacey Cheap & easy content management
- Yellow CMS that is just files and folder (use for many years for my personal website)